
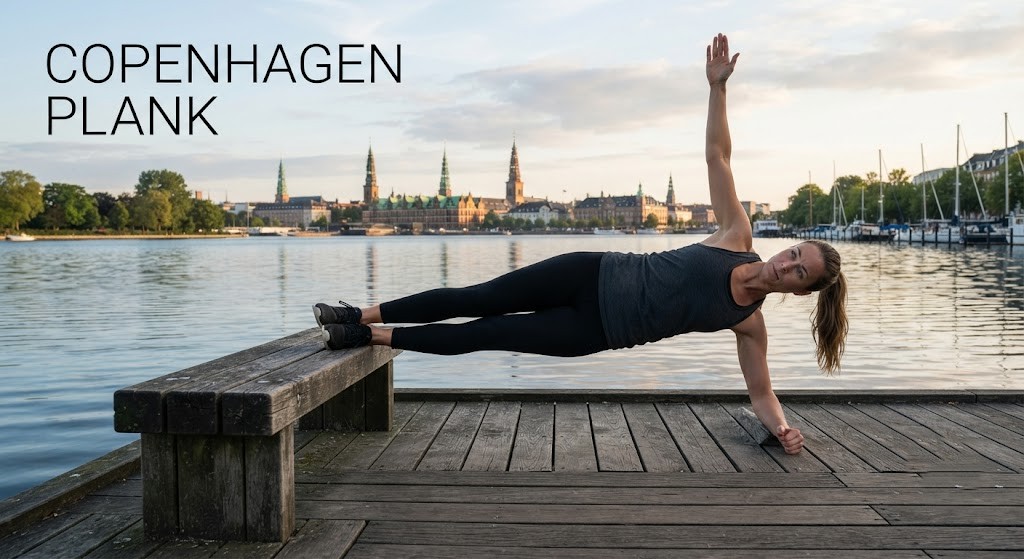
You already know the side plank is a reliable core exercise, but the Copenhagen plank takes the challenge further by placing a major demand on your inner thighs, hips, and lateral core. It can look simple, yet even a short hold can be surprisingly difficult.
Whether you’re completely new to the exercise or ready to progress beyond the basic version, this guide explains exactly how to perform the Copenhagen plank, which muscles it works, how long to hold it, common mistakes to avoid, and how to build toward harder variations.
What Is a Copenhagen Plank and How Does It Work?
A Copenhagen plank is a side-plank variation that strengthens the inner-thigh adductors while also challenging the core and hip-stabilizing muscles. You support your body on one arm or elbow and place your upper leg on a bench while keeping your body in a straight, braced position.
Unlike a traditional side plank, where both feet remain on the floor, the Copenhagen plank lifts the bottom leg off the ground. This forces the adductors of the elevated leg to work hard to support your hips and maintain your position.
For example, a traditional side plank might feel manageable for 45 seconds, while a Copenhagen plank can become challenging after only 15 seconds. The difference comes from the additional demand placed on the inner thigh and hip.
For more options, see our guide to Side Plank Workout.
Why Does the Copenhagen Plank Matter?
The Copenhagen plank matters because it directly trains the hip adductors, a muscle group that is often overlooked in conventional core workouts.
In a 2019 cluster-randomized trial, a Copenhagen-based adductor program reduced groin problems by 41% in male football players — Source: [Harøy et al., British Journal of Sports Medicine, 2019] (editor: verify figure before publishing).
Beyond adductor strength, the exercise also develops hip stability and lateral core control. This can be particularly relevant to sports that involve rapid changes of direction.
For example, a soccer player changing direction needs strong adductors and hip muscles to help control the pelvis. Developing these muscles appropriately can help reduce vulnerability to groin problems.
How Do You Do a Copenhagen Plank Correctly?
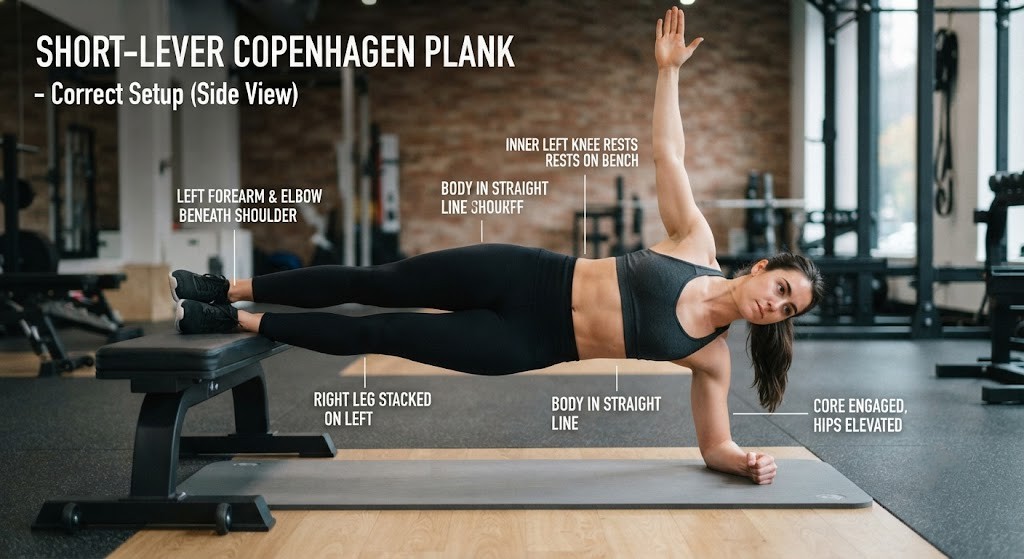
To perform a Copenhagen plank correctly, set up on your side with your top leg supported on a bench and your body aligned from head to foot.
Follow these steps:
- Lie on your side with your forearm on the floor and your elbow positioned directly under your shoulder.
- Place your top leg on a bench. For the short-lever version, support the knee or lower thigh.
- Brace your core and lift your hips until your body forms a straight line.
- Allow your bottom leg to hang or tuck it underneath you.
- Hold the position while breathing steadily.
- Lower your hips under control and repeat on the opposite side.
Copenhagen Plank Form Tips
Proper positioning matters more than simply trying to hold the exercise for as long as possible.
Keep these points in mind:
- Keep your hips stacked rather than allowing them to rotate forward.
- Keep your shoulders stable and avoid twisting your torso.
- Brace your core throughout the hold.
- Keep your body in a relatively straight line.
- Breathe steadily instead of holding your breath.
- Choose a variation that allows you to maintain control.
If you cannot maintain your position, reduce the difficulty rather than forcing the hold.
Warm up first with Hip Opening Yoga.
What Muscles Does the Copenhagen Plank Work?
The main muscles challenged by the Copenhagen plank are the hip adductors, while the obliques, abdominal muscles, glutes, and hip stabilizers also contribute to maintaining body position.
Hip Adductors
The adductors of the top leg are the primary muscles being challenged. They help support your body and keep your hips elevated throughout the exercise.
This makes the Copenhagen plank particularly useful when you want to incorporate inner-thigh strengthening into a core-focused movement.
Obliques and Abdominal Muscles
Your obliques and transverse abdominis help stabilize your trunk while you maintain the side-plank position.
If your hips begin to sag or your torso starts rotating, your ability to maintain lateral core stability is being challenged.
Glutes and Hip Stabilizers
Your glutes and hip stabilizers also contribute to keeping your pelvis level and your body controlled.
The gluteus medius, in particular, helps contribute to pelvic stability during the movement.
Build supporting strength with Oblique Workout and Adductor Workout.
What Are the Benefits of Copenhagen Planks?
The Copenhagen plank improves adductor strength, lateral core stability, hip control, and unilateral strength in a single movement.
Because it combines several demands at once, it can fit into different types of training programs.
1. Builds Adductor Strength
The Copenhagen plank directly challenges the inner-thigh adductors. Stronger adductors can be valuable for movements that require the legs and pelvis to control side-to-side forces.
2. Improves Lateral Core Stability
Unlike exercises that primarily challenge the core from front to back, the Copenhagen plank places a strong demand on lateral stability.
Your trunk must resist unwanted movement while your hips remain elevated.
3. Develops Hip Control
The exercise requires you to keep your pelvis stable while supporting your body on one side. This makes hip control an important part of successful execution.
4. Supports Athletic Movement
The Copenhagen plank can transfer well to activities involving cutting, sprinting, jumping, kicking, and lateral movement.
5. Is Time-Efficient
You don’t need long workouts to benefit from the movement. For example, two 20-second sets per side take under three minutes.
Copenhagen planks also complement other inner thigh exercises and Yoga Poses for Tight Hips.
What Is the Difference Between Short-Lever and Long-Lever Copenhagen Planks?
Copenhagen plank difficulty can be adjusted by changing the length of the supported leg and the amount of body weight placed on the elevated leg. In general, a longer lever makes the exercise harder.
| Variation | Support Point | Difficulty | Best For |
|---|---|---|---|
| Supported/assisted | Knee on bench, bottom foot on floor | Easy | Beginners |
| Short-lever | Knee on bench, bottom leg lifted | Moderate | Most gym-goers |
| Long-lever | Ankle or foot on bench | Hard | Intermediate/advanced |
| Dynamic | Adduct bottom leg up and down | Very hard | Athletes |
This progression gives you several ways to adjust the Copenhagen plank without abandoning the movement entirely.
How Do You Progress to a Full Copenhagen Plank?
To progress, move to a longer lever only once you can hold your current version for 30 seconds per side with perfect alignment.
A practical progression looks like this:
- Start with the supported or assisted version.
- Progress to the short-lever Copenhagen plank.
- Move to the long-lever version.
- Once you have control, introduce dynamic leg lifts.
- If your form breaks down, return to the previous level.
The goal is not simply to survive a longer hold. Instead, prioritize controlled movement, stable hips, and consistent alignment.
Can Beginners Do Copenhagen Planks?
Yes, beginners can do Copenhagen planks by starting with a shorter-lever or more supported version and gradually building strength.
One beginner-friendly option is to keep the bottom foot on the floor. This reduces the amount of load your elevated leg and adductors need to manage.
Start with short, controlled holds rather than immediately attempting the hardest variation.
How Long Should You Hold a Copenhagen Plank?
You should hold a Copenhagen plank for as long as you can maintain perfect form, typically 10–30 seconds per side. Quality is more important than simply increasing your hold time.
A practical starting point is:
- Beginner: 2–3 sets of 10–15 seconds
- Intermediate: 2–3 sets of 20–30 seconds
- Advanced: 3 sets of 30+ seconds or dynamic reps
If your hips begin sagging or your torso starts rotating, end the set or switch to an easier variation.
Should You Focus on Time or Form?
Form should come first.
A shorter 15-second Copenhagen plank performed with stable hips and controlled breathing is generally more useful than a longer hold where your hips sag and your body twists.
As your strength improves, gradually increase your hold duration or progress to a more difficult variation.
How Often Should You Do Copenhagen Planks?
Do Copenhagen planks two to three times per week, with at least one rest day between sessions.
For example, you could perform them on Monday and Thursday during lower-body workouts. This gives you time between sessions while allowing you to practice the movement consistently.
You can pair them with a leg workout exercises.
What Are the Most Common Copenhagen Plank Mistakes?
The most common Copenhagen plank mistakes include hip sagging, torso rotation, holding your breath, and progressing too quickly.
Hip Sagging
When your hips drop toward the floor, you lose the strong body position required for the exercise.
If you cannot keep your hips elevated, shorten the lever or use a more supported version.
Rotating the Torso
Allowing your torso or pelvis to rotate can shift the position and reduce your ability to maintain the intended movement pattern.
Keep your shoulders and hips stacked as much as possible throughout the hold.
Holding Your Breath
Holding your breath can increase unnecessary tension and make it harder to maintain a controlled hold.
Instead, breathe steadily while keeping your core braced.
Progressing Too Quickly
Moving from an easy version directly to a long-lever or dynamic Copenhagen plank can make it difficult to maintain proper form.
Progress one level at a time and only increase difficulty when you can control the current variation.
Are Copenhagen Planks Good for Athletes and Runners?
Yes, Copenhagen planks suit athletes and runners because they train the adductors and hips involved in sprinting, cutting, kicking, and lateral movement.
For example, a runner can add two sets after a training session to work on pelvic stability and adductor strength.
The exercise can also fit into athletic preparation when performed at an appropriate difficulty and volume.
Check our core workout.
How Can You Add Copenhagen Planks to Your Training?
Copenhagen planks can fit into a core workout, lower-body session, athletic preparation routine, or general strength program.
A simple approach is to perform them at the end of a warm-up or during a core block.
Core Day
3 × 20 seconds per side
Perform the Copenhagen plank after your main core work or as part of your lateral-core training.
Lower-Body Day
2 sets per side
You can place them between squats and lunges if the exercise does not interfere with the quality of your main lifts.
Athletic Preparation
2 short sets per side
Use a manageable variation before training when your goal is to prepare rather than fatigue the muscles.
How to Track Progress
Track your hold times from week to week. Once you consistently reach your target duration with clean technique, consider progressing to the next variation.
A simple video check can also help you identify whether your hips are staying aligned throughout the movement.
Copenhagen Plank Progression Checklist
Use this checklist to determine whether you’re ready to make the exercise harder:
- I can keep my hips elevated throughout the hold.
- My shoulders and hips remain stacked.
- I can breathe steadily.
- I can complete both sides with similar control.
- I can hold my current variation for up to 30 seconds per side with good alignment.
- I can progress without excessive shaking or loss of position.
If several boxes are unchecked, stay with your current variation or regress to an easier version.
Conclusion
The Copenhagen plank is a powerful exercise for strengthening the adductors while challenging the core, hips, and lateral stability. Its adjustable variations make it suitable for beginners as well as more advanced athletes.
Start with a supported or short-lever version, prioritize alignment and controlled breathing, and progress gradually rather than chasing longer hold times. Whether you add it to a core session, lower-body workout, or athletic preparation routine, consistent practice can make the Copenhagen plank a valuable part of your training.
FAQs
What is a Copenhagen plank?
A Copenhagen plank is a side-plank variation that mainly strengthens the inner thighs and core.
What is Copenhagen plank good for?
It is good for strengthening the adductors, core, hips, and lateral stability.
How hard is Copenhagen plank?
It is challenging, but beginners can start with a supported or short-lever version.
What is the difference between a side plank and Copenhagen plank?
A side plank supports both feet, while a Copenhagen plank supports the top leg on a bench and lifts the bottom leg.
What is the hardest plank to hold?
Dynamic Copenhagen planks can be among the most challenging plank variations.
How long should I hold a Copenhagen plank?
Start with 10–15 seconds per side and gradually work toward 20–30 seconds.
How many Copenhagen planks should I do?
Start with 2–3 sets per side, depending on your fitness level.
How often should you do Copenhagen planks?
You can do them 2–3 times per week with rest days between sessions.
Is the Copenhagen plank good for adductors?
Yes. The adductors are the primary muscles targeted by this exercise.
Is a long-lever Copenhagen plank harder?
Yes. The longer lever makes the exercise more demanding.
Why are my hips sagging during a Copenhagen plank?
Your variation may be too difficult. Try a shorter-lever version.
Are Copenhagen planks good for athletes?
Yes. They strengthen muscles important for running, cutting, jumping, and lateral movement.
Do planks flatten your belly?
Planks strengthen your core, but they do not specifically burn belly fat.